Handmade Mosaic Tiles

Handmade Mosaic Tiles
assorted handmade mosaic art tiles

Sunday, February 27, 2011

Studio pictures

Jill Fineberg, a friend from Santa Fe (author of the wonderful book, "People I Sleep With") was in Tucson for the recent gem show and stayed at my house for a few days.  She's a professional photographer and took some great pictures in my studio.  Of course her 'eye' has a different view....aren't these marvelous!

Salt shakers holding a variety of colors of grout.

Who else has Our Lady of Guadalupe on their workbench?

An angel and Our Lady

My growing edge...people tiles. What do you think of them? How would you use them?
My basket of handmade ornaments.

Isn't this cool?!

My signature tiles....

Tuesday, October 19, 2010

Mosaic Backing Boards -- so many choices!

Today I thought I'd tackle one of the most controversial issues about doing mosaics -- what do you mount your creation onto? I certainly have my bias. And you can probably spot it pretty quickly when you look at the picture -- you can see that I don't have any plywood or masonite in it! I know many schools and artists who use wood under their mosaics but my concern is that even though the wood may be sealed thoroughly, eventually moisture will seep into the wood through a small crack and if that happens, the wood will swell. And when this happens, it is likely the tiles will pop off. Maybe not right away...but eventually it is likely.

These are the backing boards that I use -- each has it's specific application and there are pros/cons for each but all of the backings I use are weather proof.

WEDI BOARD - This is what I use for nearly all my mosaics. I go to Phoenix to buy it (it's cheaper there) but is still very pricy compared to the other products. It has a cement layer with steel cables that sandwiches a foam core and is very strong and rigid -- a 3x5' board weighs about 7 pounds. I usually cut it into quite irregular shapes with a small electric jig saw but it can also be cut easily with a utility knife. I use 1/4" thickness in frames and for smaller mosaics and 1/2" thick for larger items. A big advantage to Wedi is that it is very light weight, so finished mosaics are easy to hang using either a copper wire or a 'wedi hanger' that I purchase from mosaicsmalti.com.

EASY BOARD is about 1/4 the cost of Wedi and is easily cut into any shape with a utility knife or jig saw. It is available from Home Depot or Lowe's and is very light weight ( maybe 6 lbs. for a 3x5' sheet). It is pretty flexible and 'bendy' so I don't use it very often -- only in small frames where it is well supported. But if I were doing mosaic with large pieces that had it's own rigor, I would consider using it more. It is important to seal the cut edges when using easyboard or it won't be waterproof.

HARDIBACKER, aka Sheet Rock is a cement board that is available at Home Depot/Lowe's and is also about 1/4 the cost of Wedi. Unfortunately, it is so heavy that I can barely lift a sheet -- a 3x5' sheet of 1/4" hardibacker weighs about 40 pounds. And you have to store it laying flat (I used to put it on my garage floor and straddle my car over it) or it warps badly. If you score it with a utility knife, it is possible to break it by hand but it breaks only in square or rectangle shapes. I've heard of people cutting it with a saw into odd shapes but the dust from that is a serious concern -- even when you break it it is necessary to wear a mask to avoid the dust particles. If I were making square tables that I wanted to be heavy, I would use this product but the weight of it makes it difficult to use on hanging products unless it is permanently screwed into the walls and tiled over.

ROCKRITE is a cementous board that comes in 2x4' boards and is used mainly in countertops because it doesn't require plywood underlay. It comes in a 2" thick board that can be scored with a utility knife and broken. It's a good product to use on a bench top because it is strong and rigid. I'm thinking of making some sculptural pieces with this product -- will let you see pics when I get around to doing that!

DENSHIELD is a gypsum board that is also used for tiles. It comes in a 4' square sheet that is inexpensive. It cuts easily with a utility knife or jig saw -- but it's big disadvantage is that it is absolutely necessary to wear a mask and the dust is the kind of dust that you can't clean up easily...it sticks onto everything and stays there. I tried this board but ended up giving it away!

WOOD -- when would I use wood? What about that fabulous old table that you want to put tiles on? If at all possible, I would securely attach wedi board to the table top before tiling it. Or if the wood were thick enough, I might try to have a 1/2" deep area routed out so I could sink wedi into it -- then do the tiles on top. I know there are more modern processes where wood is treated to be very dense and coated like for kitchen cabinets -- most of those would be fine to use for mosaics. At least I wouldn't hesitate to use them.

So, the most important point to take from all this is that when you are making your mosaic, the backing board matters a great deal. Don't hesitate to give me a call if you're struggling to decide what to use for backing and I'm glad to help you think through your options. Just remember, the effort you're putting into your creation and the expense of the tiles you are using really justifies thinking this issue through carefully. Have fun!

Sunday, August 22, 2010

Bench covered with handmade tiles


I've been wanting to tile a small bench to put by my front door for a long time. Finally, I found a concrete form at the Mexican Garden at 2854 E. Grant Road -- they had larger ones but Art Loya offered to make one the size I wanted for $45! A bargain! The top is 12 x 24". If you're interested in doing a similar project, check out their benches. They're very reasonably priced and it's fun to brouse around the place. They also have small talavera and solid color tiles that are the right thickness to go with my handmade ones.

I have a ton of tiles on this -- probably many more than anyone else would want to do. The tiles are colorful and I used black cherry grout. It fits nicely in my spot. And what's best is that it doesn't need any water like the plants that I repeatedly killed from neglect there. If you wonder, the lettering on the top has a saying that I've always liked: "All the flowers of all the tomorrows are in the seeds of today."

I think if I were doing another bench, I'd probably just put tiles on the top surface. I'd stain the legs to match the grout instead of putting tiles onto them -- it would make the project much less expensive but would still be just as lovely. And another thing -- I suggest getting some help with lifting -- even though it was in 3 parts, each part still weighed a ton! At least!

Tuesday, July 20, 2010

DRY GROUTING


Today I grouted a cute little piece -- and thought I'd show you how to 'dry grout'....it gets rid of that nasty pail of water that's difficult to dispose of. First pic is of the piece that has the tiles all attached to the wedi board with mastic. It's sitting on my workbench and has dried overnight.


This second pic is where I have spread the whole thing with black grout that was mixed with water. I like it mixed up pretty stiff -- I have spread it on with a damp sponge. Yes, it's a mess and you can barely make out any of the tiles. I'm careful to not pile on extra grout on top of the tiles.


Next I covered the whole thing with dry grout and let it sit for 3-4 minutes. The dry stuff soaks up some water and raises the level of the grout that is in the spaces between the tiles.


Next, I use a pool noodle that I have cut into slices and I rub that over the dry grout to get down to the tiles. Stuff flies a bit! But I go over the whole piece, rubbing in a circular motion until all the tiles are revealed. Since the grout is a bit higher, you have to be careful to find all the little filler pieces and reveal the edges of all the tiles. Also, the textured tiles get filled in and need to be brushed out. Sometimes I use a toothpick but a toothbrush also works well to do this. Once I have all the grout smoothed and off the tiles, I let it set 5-10 minutes.


After the piece has set a bit, I take a soft rag and polish and it's done! Here is the finished piece! This one is a baby gift that a customer ordered and I personalized it with tiles with the birthdate and baby's name. I can just picture the little one pointing out the different animals as she learns their names!
Wrap up the newspaper and dispose of it in the garbage and you're done! This way is so much easier to clean up!


Thursday, July 8, 2010

Mosaic Class in my studio....

Laurel's table;


Anna's mosaic:

Judi and her completed mosaic --isn't it wonderful!
I recently remodeled my studio -- it's looking pretty good! And I finally have air conditioning that works really great! My studio is my garage -- and yes, the car sits outside!

On June 12, Judi organized a group of 6 of her family and friends to come for a 'private' mosaic class. She had done several classes with me before so they had all seen her wonderful creations and arrived eager to create their own masterpiece. And what they created, really all turned out FABULOUS! Check 'em out!


Tuesday, July 6, 2010

The beginning....

My first entry.....

It's been soooooo hot in Tucson... I think today's high is 105 degrees. A friend called me this morning and said that it was so hot yesterday that he saw two trees fighting over a dog!


What do I do when it's like this outside? First thing in the morning, I head out to my studio, crank up the a/c and make tiles! I love cutting shapes out of slabs of soft clay. Today I'm using an earthy red clay called Hawaiian Red...it's a bit sandy texture but has a wonderful feel to it. Today all the shapes of leaves, small animals, flowers etc. are dark brown. Tomorrow and probably the next day, I'll glaze all my tiles and like magic, the kiln's fire will create brilliant colors. Even after 9+ years of this, every day is like Christmas when I open the kiln. Usually I'm in my nightgown and it's just getting light outside and I'm 5 years old all over again!


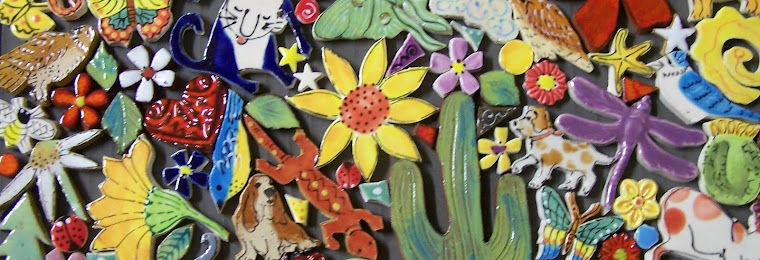
By the end of the week, I'll have fired these same tiles a couple of times and they will look like the tiles in this picture....colorful, playful, FUN! The possibilities are endless!